

As someone who has given birth before, does any of this sound familiar? Maybe you:
✨had a birth experience that didn't quite go the way you planned. Or, if you are like me, your "plan" was completely derailed.
✨experienced interventions or an injury (like a perineal or vaginal tear).
✨experienced a postpartum recovery that felt anything but "smooth" because of tearing, hemorrhoids or prolapse.
Or, it's possible things went well. And you just want to
✨ensure that you can pull that off again for this birth.
So...
This time around, you know you want to at least gather more info.
Or possibly do things differently, you just aren’t sure what or how.
Here's the truth: reducing your risk of pelvic floor injury during birth isn’t about luck. It’s about preparation & the strategies you use...
✔️ before birth
✔️during birth (especially if you’re planning a hospital birth).
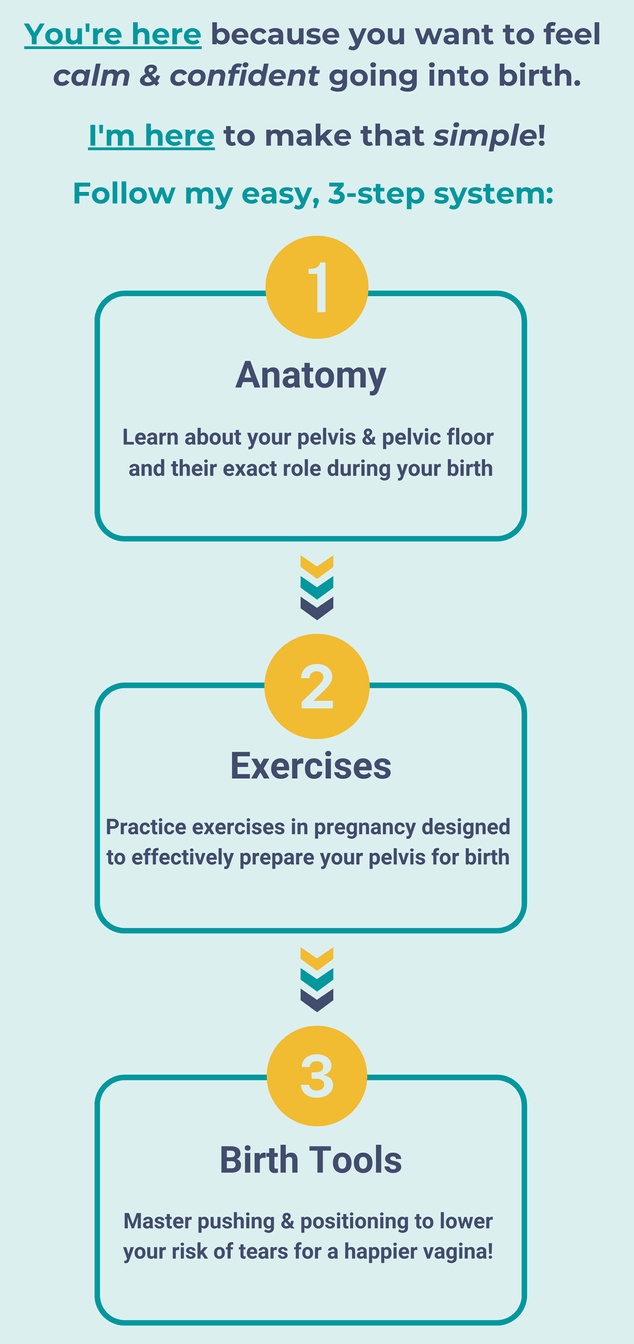
💚 Today's focus is on what you can do NOW to prepare your pelvic floor for a smoother birth and easier recovery.
Step 1: Get to Know Your Pelvic Floor (and Why It Matters More After Birth Trauma)
If you’ve experienced injury before, understanding your pelvic floor is even more important this time around. Picture it like a hammock holding up your pelvic organs. It’s all muscle, meaning it can be trained to work with your body during birth.
But after trauma? It’s common for the pelvic floor to hold tension, making flexibility and mobility even more essential this time.
👉 Here’s a simple exercise: try mapping out your pelvic floor with your breath.
✨Bonus: I call this space the pelvic "diamond" and once you see it, it all makes sense! Check out the image here to guide you 👇

Step 2: Understand What Your Pelvic Floor Actually Needs to Do During Birth
Forget the old advice about doing endless Kegels.
✨Your pelvic floor’s job during birth is to stretch and open.
Here’s the kicker: It can stretch up to 2.5x its original length as your baby moves through the birth canal. That’s a lot of stretch and without the right preparation and right birthing environment, it’s easy to understand why tearing happens.
If your last birth included perineal trauma, it’s even more important to focus on flexibility over tension.
Step 3: Use Your Breath to Release Tension
If Kegels aren't the answer, what is?
It starts with your breath 💨.
When you breathe deeply and intentionally, you’re actually teaching your pelvic floor how to release and open.
Try this:
Inhale: Feel your pelvic diamond 💎 expand and lower which creates space.
Exhale: Feel it gently return to it's starting spot. ❌ NO squeezing, just allowing the natural movement.
✨This simple practice is the foundation for reducing tension and preparing your pelvic floor for birth.
Step 4: Play with Your Diamond’s Size (It’s a Game-Changer)
Your pelvic floor can expand or contract, use that to your advantage!
Here’s a practical way to train this:
Small diamond (Cat pose): Useful when baby is high in the pelvis, helps create more space at the inlet.
Big diamond (Cow pose): Ideal when baby is lower, opens the pelvic outlet for a gentler push and less tearing.
If you’ve experienced injury before, this kind of movement helps retrain your pelvic floor to work with your body, not against it.
Step 5: Pair Breath with Movement
Movement isn’t just about exercise, it’s about preparing your body for the dynamic process of birth.
Focus on gentle, pelvic-opening movements like:
✔️Rock backs on hands and knees
✔️Hip hinge stretches
✔️Child’s Pose
✔️Pelvic tuck/untucks
These movements encourage flexibility and keep your pelvic floor responsive.
Step 6: Practice the Right Birth Positions (Because Not All Are Created Equal)
If you delivered on your back last time, you might already know, it’s not always the best option for protecting your pelvic floor.
Practicing upright, side-lying, or hands-and-knees positions now makes it easier to advocate for and actually use them during your hospital birth. (And yes, you can request these positions, knowing how to navigate hospital policies is half the battle.)
Step 7: Consistency (and Why It Matters More the Second Time)
Consistency with these practices can make a huge difference, even if your first birth felt out of your control.
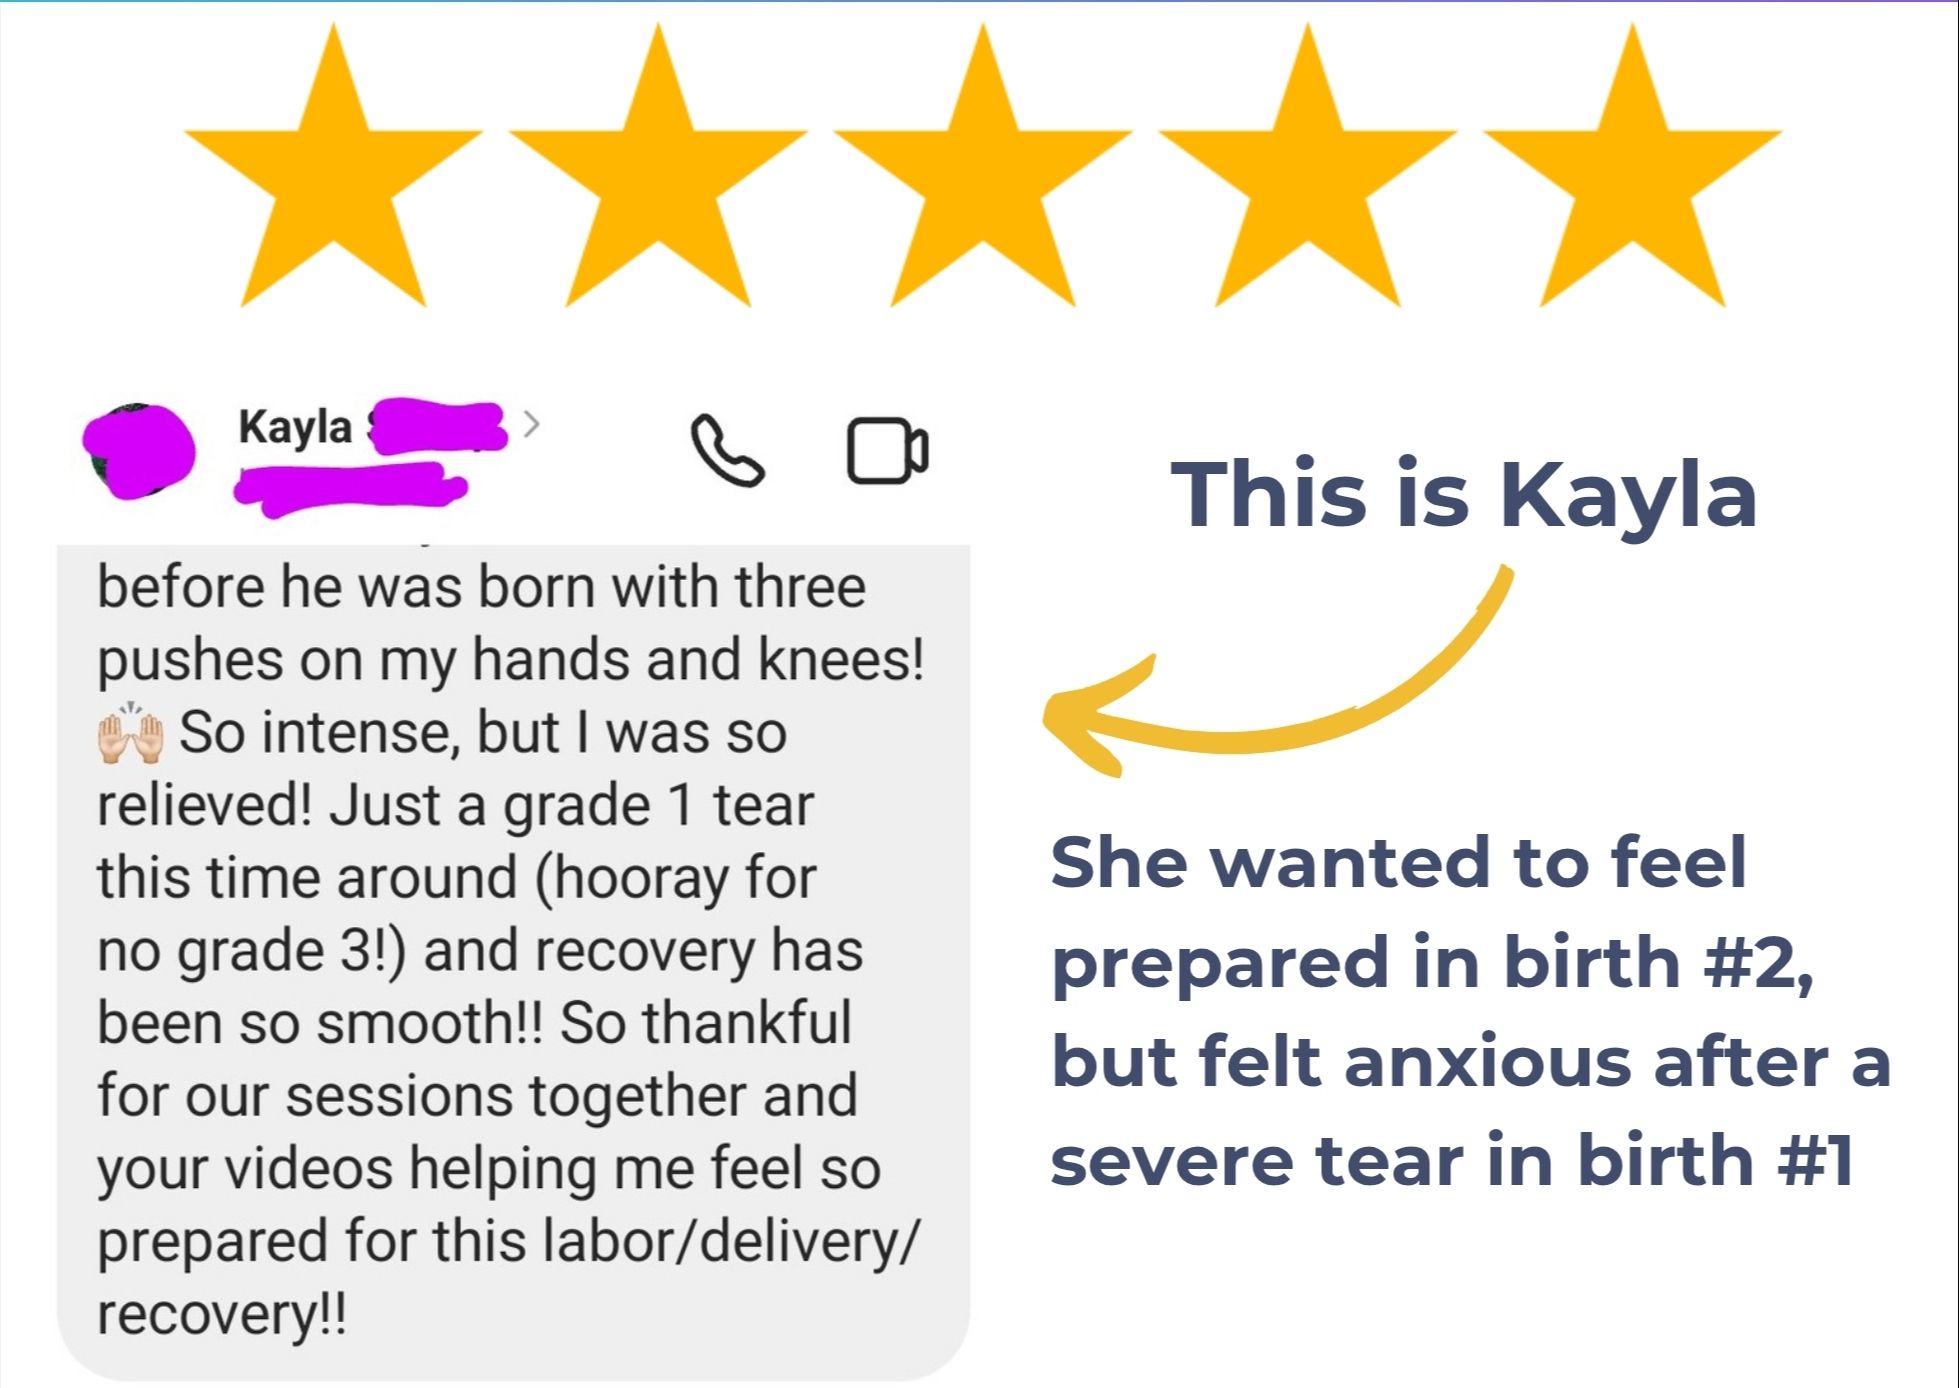
Here’s what Kayla shared after doing this work:
Step 8: Don’t Just Hope for a Better Birth 👉 Have a Plan
💡 The truth? It’s not just about physical prep, it’s about knowing how to navigate hospital-based birth, where routine practices (like coached pushing, pushing too soon, less than optimal positioning or interventions) can increase your risk for injury.
But when you know exactly what to do during birth, you can reduce these risks significantly.
That’s why I created the Pelvic Floor Protection Plan - to give you a clear roadmap for both physical preparation and birth-time navigation.
If you want to feel fully prepared, and finally confident that you’re doing everything you can to protect your body, this is for you!!
Ready to take control this time? Grab the Pelvic Floor Protection Plan and get started today.
Reduce The Risk For Tearing Your Vagina
Push Smarter 💜 Protect Your Body 💜 Heal Faster
So you can enjoy what matters most postpartum!

Did you know?
90% of women have pelvic trauma during birth.
50% have postpartum pelvic concerns.
But I have some good news...
✨ This doesn't have to be your story!
But Jess, isn't that normal after birth?
❌ Nope
✅ The Truth is...
Some of these things are preventable!
But...
We aren't taught these simple birth strategies that protect our bodies, so we can live our postpartum lives with more comfort!
VALUE: Your vagina is priceless
PROGRAM PRICE: $29 USD
(One-time payment)
**Please Read - Due to the digital nature of our products, we do not offer refunds.**
These things aren't as helpful as we're told:
❌ Pushing practice (without pelvic prep)
❌ Perineal massage (it's painful!)
❌ Warm compresses (not enough on its own)
What actually protects you:
✔️ Exercises that open your pelvis
✔️ Training your pelvic floor to release
✔️ Pushing with ease, not force
✔️ Creating more space at baby's exit
✔️ Avoiding outdated hospital practices
When you have this info before your birth, here's what's possible ⬇️

Sure! This helped Ashley, but is this course for me?
Yes, if you...
✔️ Are having your first baby and worry about tearing, pain, prolapse or pee problems after birth
✔️ Had a birth injury before and want a better outcome & recovery this time
✔️ Want a lower-intervention, more natural hospital birth
✔️ Are planning either a medicated or unmedicated birth
✔️ Want to feel more in control of your birth
✔️ Know you need more than a standard birth class


BUT HERE'S THE THING!
Kayla & Ali didn't...
❌ leave it up to chance.
❌ assume their provider would help protect their pelvis.
❌ "just hope for the best."
THEY PLANNED FOR IT.
They took control to birth their babies AND protect their bodies!
✨PS: You can do this too!
YOU JUST NEED THE RIGHT INFORMATION!
**Please Read - Due to the digital nature of our products, we do not offer refunds.**

Here's a sneak peek of the course
FAQs
Will this course guarantee I won't experience a birth injury?
Are you qualified to teach this stuff?
Is it too late for me to take this course?
Is this just perineal massage and warm compress advice?
Is this course for me if I'm planning a hospital birth?
Is this course for me if I want an epidural?
Is this course for me, a first-time birther?
Is this course for me if this is NOT my first birth?
I'm already taking a birth education course. Do I need this, too?
**Please Read - Due to the digital nature of our products, we do not offer refunds.**

